Search This Blog
Wednesday, December 29, 2010
Next step of water Project
To give the water a realistic feel the next step of the water process involves HDRI imaging and caustics lighting in Maya Mental Ray. I have only found a few tutorials most of the good material in hard reference. Progress update soon.
New images for water tests inside hot springs enviroment
These are the newest renders with all the hypershade problems fixed but still with the absence of lighting and rendering (just using all defaults from MR settings in Maya.) The texture pack for the hot springs rock formation itself is also not the final version in which will not looked all stretched on the side surfaces of the structure. After the ambient inclusion render and the lines in the top image will no longer exist.
Monday, November 22, 2010
Water pet project
This version is not very well rendered or lite and i do apologize but i wanted to at least make sure you could get some sense of what was accomplished. These pictures consist of the hypergraph networks used to create this new type of water and also the water before and after rendering.

Thursday, November 18, 2010
SamplerInfo Node and Facing Ratio addition
To give the clear affect of water and how it would act in a real life situation i wanted to make sure that depending on what angle you viewed the water from depicted to the camera how the water was perceived. In order to achieve this affect a few things needed to occur. Firstly i had to develop two separate texture packages both relatively similar but still different in some aspects such as color and transparency most importantly. After creating these two seperate packages one of which is below(the only thing differing from the other package is some change to transparency a little tweak in color and the weight that the two textures are given). When these two separate packages are created you can then apply them to a simple ramp with three or so colors depending on the depth you want to achieve. The ramp is run on a value system from 0-1 like a lot of things in Maya. 0 being at the top of the ramp and 1 being at the bottom, you can use these integers to tell the camera what to render. 0 renders everything facing the camera with the texture pack you created for the color at the top of the ramp, while 1 renders the polygons which normals are not facing the camera with the other texture package you applied to the color at the bottom of the ramp.
Friday, November 12, 2010
Finally believe it has been developed.
After spending so much time on this i can almost understand the argument of why game creators do create water in the manner that the do. I have yet to get the Level of Detail Node to work completely along with the facing ratio node. This will allow the water to be at the perfect amount of detail and retain the correct visual properties completely based off of where the plane is being viewed from. I have however managed to resolve the biggest issue of the random looping of the geometry through the displacement map animation. Two simple things had to occur for this to happen. First if you animate a fractal you can go into its properties of animation and you must change the post and pre infinity to cycle with offset. After this you must set a new expression on the animated time for the fractal. This MEL script is very simple...Nameofobject.translateX=rand(0.5) this allows the x value of the translation that occurs due to the fractal randomizing the geometry of the plane to pick random integers between 0-.5 everytime the animation is restarted. You can then repeat the process if the object is also animating the geometry on the Y or Z axis.

Part of the hypershade for one texture pack for the facing ratio when it is directly viewed from the top view.
Wednesday, November 3, 2010
Vector displacement maps and brushes
 |
| Vector displacement map CGTalk thread inquiring about how to utilize vector displacement maps. |
Friday, October 29, 2010
Wednesday, October 27, 2010
Link to cg talk question
This is the link to my CGtalk post and also to one of the most interesting tutorials and methods of modeling i have ever seen.
http://forums.cgsociety.org/showthread.php?f=221&t=928449
http://forums.cgsociety.org/showthread.php?f=221&t=928449
Thursday, October 21, 2010
I have tried all of these different forums in hopes that someone would have answers as to how to create a stencil for mudbox but thus far no one has posted an answer. I have posted my question on cgtalk in the mudbox forum but it takes upto 24 hours to make sure my post is not spam.
Also have new textures on the springs but cant get it to render out. It seems to be to intensive for my laptop and for the computers here at school.
http://download.autodesk.com/esd/mudbox/help2009/index.html?url=WS73099cc142f48755-471cc4bd11960d8a16c-6ed7.htm,topicNumber=d0e13185
http://download.autodesk.com/esd/mudbox/help/topics/UserGuides.Stencils.html
http://www.pixologic.com/docs/index.php/ZBrush_To_Maya_Displacement_Guide#Generating_a_Displacement_Map
http://forums.cgsociety.org/forumdisplay.php?f=221
Thursday, October 14, 2010
Mudbox Modeling
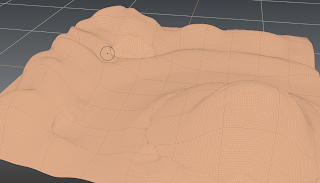
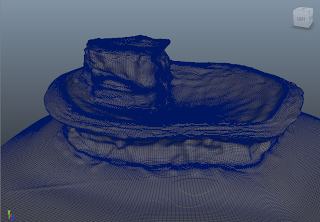
Finished most of the modeling in Mudbox. Waiting to use the displacement map still trying to figure out the new tincturing system first.
The high poly version with Wireframe.
Attempting to texture this but not even close to the result i wanted.
With the new texturing system i can make this object and picture which looks hilarously bad into this:
Which is much nicer. It implements three different textures and uses a fractal to randomize the placement in order to make it look more random and less uniform so it looks realistic.
Hypergraph set up of the new texturing system. Tutorial video on how to coming possibly tonight.
Factory setting had to remodel the buildings due to there structure the uvs where a pain to lay out and the textures are working much nicer now. Also went back and remodeled the base shape with multiple objects that are not combined to make uving easier.
New Ground Plane fixed the peative nature and figured out how to layer in even more subtle details such as in the top right corner there is sorta a hole with a craked part of earth.
Monday, October 4, 2010
Thursday, September 30, 2010
Sunday, September 26, 2010
Thursday, September 23, 2010
Thursday, September 16, 2010
Sunday, September 12, 2010
Monday, September 6, 2010
Computer Animation Update 1
This past Thursday and Saturday i meet with two different illustration majors who will be helping me to create and develop two separate environments. One of these two illustrators will have sketches to me wihtin the week which should allow me to start devoloping the enviroment very soon. In the mean time i have started to create the recycling factory near 5th and 5th downtown.
Subscribe to:
Comments (Atom)


